
Hardiebacker Installation Under Tile Floors
Lately in my travels, I’ve come across many improperly laid Hardiebacker board floors. Installers are skipping important steps.
The most common indicators of improperly installed backer board are that the tiles are bouncing loose/and cracking and grout is coming out as well. The installers are not following the manufacturers’ instructions.
First when cutting the boards, allow at least a 1/8 to ¼ inch gap between the boards and at the outside walls for expansion.
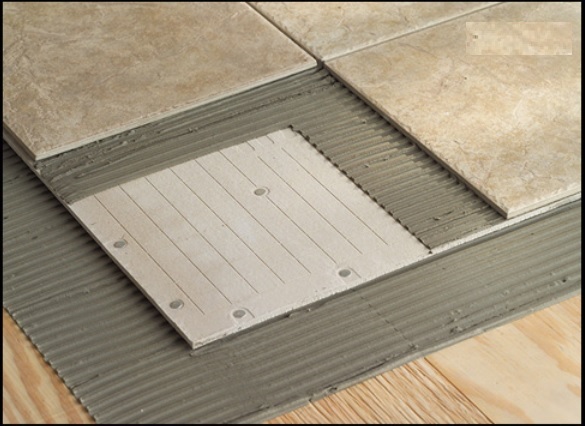
Second, you must use non-modified or minimally modified thin set underneath the board, applying it with a ¼ inch square notched trowel. The thin set must be wet enough to stick to the porous and dry Hardiebacker board but stiff enough to hold up the trowel ridges.
Then, before the thin set dries, screw or nail the board in all the specified places. The ¼ board has small impressions indicating where to nail. If you are using nails, they should be galvanized so as not to bleed rust into the grout joints. Each board requires 66 fasteners. Be sure to use fasteners that are at least 1 ¼ inch long. Problems also occur when the installers are not screwing or nailing in enough places.
When the subfloor is plank and not plywood, I use the thicker ½ inch Hardiebacker board for more density and structural strength. Be sure to use longer fasteners; at least 1 5/8 inch long. There are no impressions showing you where to nail on the 1/2 thick board. I screw/nail every 6 inches, just ½ inch in from the perimeters and every 8 inches on the interior surface of the board.
Self adhesive mesh tape is applied on the seams. Then a light coat of thin set is applied over the tape.
Be sure to use a quality modified thin set to adhere the tile to the backer board. A special tip: Take a moist, but not drenching wet sponge and lightly wipe the dust off of the surface of the Hardiebacker board for better thin set adhesion to the board. Be sure not to let the thin set glaze over before applying the tile. Perform a simple test if your thin set ridges have been uncovered for a while; lightly brush your fingers over the edges. If the thin set doesn’t stick to your fingers, it’s time to re-comb the thin set. Also, when first setting the tiles, always pull up a tile to see if you are getting 90% coverage on the backside of the tile.